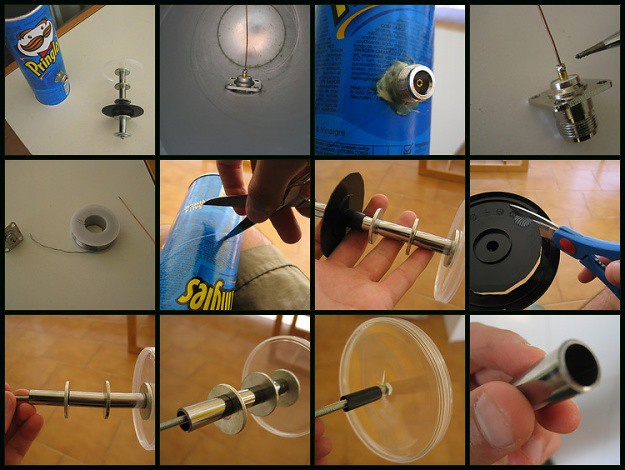
How to Make a Wi-Fi Antenna?
Enjoying WiFi throughout the house and even in the garden has become one of the challenges of home connectivity. WiFi antennas are commercially available to strengthen the transmission signal. But it is also quite possible to make one yourself with some basic knowledge of DIY and connectivity.
Here is how to make a home WiFi antenna at a low cost!
Equipment needed to build a WiFi antenna
To make your own WiFi antenna, you will need
– 1 can of “Pringles” and 2 matching lids;
– 1 N-type female connector with screw frame;
– 1 copper wire of 3.81 cm in length;
– 1 threaded rod 6 mm in diameter and 14.29 cm long;
– 2 self-locking bolts of 6 mm diameter;
– 1 aluminum tube 10 mm in diameter and 12.20 cm long (or 4 pieces 3.05 cm long);
– 5 steel washers of 2.54 cm diameter.
Attention: your computer must be equipped with a PCI card with a female SMA connector to connect your WiFi antenna.
Other materials
– Cloth;
– Paper scissors;
– Gel glue;
– Pencil;
– Soldering iron;
– Tape measure;
– Can opener;
– Sanding paper;
– Drill
1. Prepare the base of your WiFi antenna
To create the base of your WiFi antenna:
– Get a tube-sized box, the type of the “Pringles” brand of chips.
Empty the box and clean the inside with a rag to not leave any traces of vinegar.
– Cut the inside rim of the opening with a can opener and sand it smooth.
Caution: do not cut the base of the can.
2. Drill the can

With a drill, drill a 16 mm diameter hole in the can, exactly 8.57 cm away from the base of the can.
Tip: Do not drill directly with a 16 mm drill bit, as this may break the can. Start with a 6 mm drill bit and enlarge the hole by increasing the diameter of the drill bits to 16 mm.
3. Solder the copper wire and connector
Take your female N connector and a 3.81 cm long copper wire.
Tip: Use a female N-type connector with a screw frame rather than a hole frame.
Solder the copper wire to the connector.
4. Install the connector of your WiFi antenna
Screw your connector into the 16mm diameter hole copper wire towards the inside of the box.
Note: if you have chosen a hole frame, glue the base instead of screwing it down to preserve the shape of your box.
5. Prepare the elements for the front sensor of the WiFi antenna
To make the front sensor of your WiFi antenna:
– Take your 6 mm diameter threaded rod and cut its length to 14.29 cm.
– Cut the aluminum tube (10 mm outer diameter and 8 mm inner diameter) into 4 pieces of 3,05 cm length.
– Take a second Pringles can lid and cut around it so that it is 7.62 cm in diameter (so that it fits inside the can).
6. Assemble the front sensor
In the center of your two box covers, cut a hole big enough to fit the threaded rod through, then:
– Glue one of the 1-inch-diameter steel washers to the inside of the first lid where the hole is.
– Screw a self-locking bolt onto the end of the threaded rod and slide it into the hole in the cover.
Next, place in order along the threaded rod
– a piece of aluminum tubing;
– a washer;
– a piece of aluminum tubing;
– a washer;
– the second cover with a diameter of 7.62 cm;
– a piece of aluminum tube
– one washer;
– a piece of an aluminum tube;
– one washer;
– one self-locking bolt.
7. Place the front sensor of your WiFi antenna

To finish:
– Place your front sensor inside the box, positioning the original cover in its original position on the “Pringles” box.
– Connect your “Pringles” WiFi antenna to your computer’s built-in WiFi card via a coaxial cable with a male SMA connector at each end.
Good to know: a classic WiFi antenna offers power between 4 and 6 dBi (isotropic decibels). The tests made on a WiFi antenna, “Pringles,” show that it can reach between 12 and 15 dBi.
Get to work to make your WiFi antenna now! And remember to share your experience in the comments below.


One reply on “How to Make a Wi-Fi Antenna”
Hi there, after reading this amazing piece of writing i am also glad to share
my experience here with colleagues.